The Crimping Chronicles: H-Tape or bust

Previously on The Crimping Chronicles
You get to the crux of a tough climb, and turns out that hold that looked manageable from the ground actually requires an aggressive crimp (surprise). It’s the last climb of the day, and you are feeling beat. While your foot fumbles around for a hold, you think “Thank goodness for that tendon locking mechanism that will save me energy!”. You settle on an absurdly tiny chip to gingerly place your toe. Regrettably, your foot immediately slips out from under you. You don’t let go of the crimp and you hear a devastating "POP”.
It is likely a damaged A2 pulley.
What can you do about it?
It is tough to rehab a pulley. It is non contractile tissue which has a couple of implication.
1) You can’t strengthen it by building muscular strength.
2) It will not repair itself.
Like anything, there is a spectrum of damage you can do to an A2 pulley - everything from a sprain where you have irritated the tissue to a full blown rupture. In some cases, surgery might be warranted. This is determined by a surgeon evaluating your imaging results.
This might sound like there isn’t much to do, but for those of you who do not require surgery, there is something that can help. It is wildly misunderstood, used more as a fashion accessory to show how serious of a climber you are. But when applied appropriately, it can have a positive effect.
Tape.
It’s true; under the appropriate circumstance, it serves a purpose. To understand how, let’s revisit that diagram of the flexor pulleys.
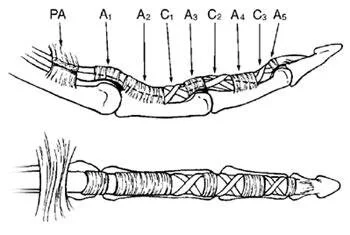
The purpose of the pulley system is to keep the tendon next to the bone to allow for movement. If you stretch, or partially tear one of these pulleys, the flexor tendon will pull away from the bone, which is referred to as bowstringing. The primary goal for taping is to reinforce the pulley to hold the tendon down as close to the bone as possible to decrease the strain applied on the injured pulley when you bend your finger.
A good number of researchers have looked at the effectiveness of different types of taping methods on pulley failure. But perhaps one of the most notable studies was published in 2007 by Schoffl et al, which examined the effectiveness of taping on the flexor tendon pulley.
I fear my Coles Notes version of this study will not do it justice, but let’s just say it was masterful. They used live climbers who had an injured pulley, and did a side by side comparison of a variety of taping techniques, looking at the perceived sense of security, peak force generation, and distance between the tendon and the bone via ultrasound. HOW COOL!
One technique rose to the top as the best overall performer. It was not wrapping tape around the base of your finger until your finger turned an uncomfortable shade of purple. It’s called the H-Tape method.

The H-Tape Method is as follows:
Take a 10cm long and 1.5cm wide strip of stiff tape. No stretchy K-Tape stuff here.
Split it in half from both ends with only about 1cm holding the whole thing together in the middle.
With the finger straight, wrap the two straps closest to you around the bottom part of the first joint of the finger.
Bend the finger, then wrap the two furthest straps around the top part of that same first joint.
(Psst, you can go to Instagram and find a video of me doing the H-Tape method)
Not only did the test subjects report this style of taping as feeling the most secure, their crimp strength was objectively higher with H-Tape versus other methods on the same injured finger, and the tendon to bone distance was the smallest.
An interesting takeaway from this study is how none of the taping techniques increased crimp strength in healthy, non-injured fingers. This suggests that, objectively speaking, prophylactic taping of your fingers might not be beneficial. However, there is always room for the placebo effect and the peace of mind that comes with just feeling more sure of your hands.
And now, for the practical stuff about taping and beyond:
Use rigid tape. No stretchy K-Tape - we are trying to pull the tendon towards the bone and the stretch won’t help. I like using the hardcore Leukotape-P because it is the duct tape in the athletic/rehab world. White athletic tape is ok but the adhesive isn’t as strong. It might be worth investing in a roll of the good stuff if you have a torn or inflammed pulley.
Watch the video on my Instagram feed to see how it is done! You can find it here.
In an ideal world, you would replace the tape after every climb. That is because chalk and sweat will compromise the application. If that is too extra for you, that’s ok, but I would recommend changing the tape after a few climbs (30min).
Climb smart. As I have mentioned before, the mechanism of injury boils down to being downright sloppy - a slipped foot here, a dynamic crimp there. Being a stronger climber, having better footwork, and improving your endurance will go a long way to preventing these injuries. If it’s the end of the session, maybe don’t do 5 attempts at that dyno to a crimp.
Finally, if you don’t already have one, get yourself to a physiotherapist to see if there are any weak links that need some attention. Maybe you overgrip to compensate for a weak shoulder. These are things that can lead to injuries down the road and it is best to get them looked after by a professional. You know what, I might have an opening in my schedule! Come on in and visit!
After almost a full month of burying myself in articles about pulleys and taping, it is time to take a pause from The Crimping Chronicles. They will be back, don’t worry, but it is time to give some of my other areas of interest some love. Thanks for following along in this first climbing series and I look forward to nerding out some more with you!